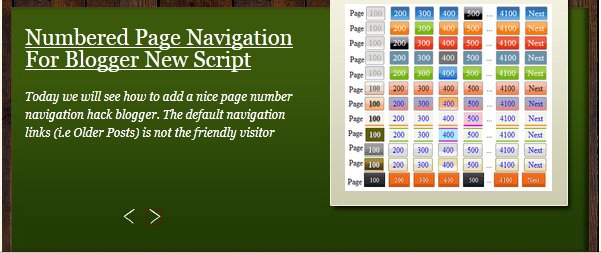
မဂၤလာပါ သည္နည္းပညာေလးကေတာ့ မိမိတို႕ဘေလာ့မွာ ကိုယ္ညႊန္ျခင္ အေရးၾကီး
ပို႕စ္ေနရာေလးေတြကို စလုိက္တာ ပုံစံေလးနဲ႕ လွလွပပ
ညႊန္ျပလိုတဲ့နည္းလမ္းေလးျဖစ္ပါတယ္... သည္လို နည္းလမ္းေလးေတြကို
ပုံစံအမ်ိဳးမ်ိဳးနဲ႕ တင္ျပေပးသြားမွာ ျဖစ္ပါတယ္...
နံပါတ္ (၁) -
နံပါတ္ (၂) ကိုူလည္း တင္ျပထားခဲ့ျပီးျဖစ္ပါတယ္...ေနာ္... ေအာက္မွာ
နည္းလမ္းနဲ႕လိုအပ္တဲ့ကုဒ္ေတြ ေပးထားပါတယ္... ေလ့လာျပီး
ကလိလုိက္ေနာ္....လန္းးးတယ္...ဂ်
►1. Login လုပ္လုိက္ပါ ဘေလာ့ကာကို
►2. Layout ကိုကလစ္ရပါ့မယ္ မိမိတို႕ Dashboard ကေနေပါ့
►3. Add a Gadget ကိုကလစ္ေပးလုိက္ပါ
►4. HTML/Javascript. ကိုကလစ္ျပီး က်လာတဲ့ ေဘာက္ေလးထဲမွာဘဲ
►5. ေအာက္ကေပးထားတဲ့ ကုဒ္ေတြကို ေကာ္ပီယူ ထည့္လိုက္ပါ
အဲေနရာမွာ ေအာက္ကကုဒ္ေတြ ကို ထည့္ေပးလိုက္ပါေနာ္....
<script src="http://code.jquery.com/jquery-1.10.2.js" type="text/javascript"></script>
<script
src="http://24work.webs.com/24work-blogspot/featured-post/17-content-code/n17-content-slider-04.js"
type="text/javascript"></script>
<a href="http://24work.blogspot.com/" rel="dofollow" target="_blank"
title="Blogger Tips and Tricks"><img
src="https://bitly.com/24workpng1" alt="Blogger Tips and Tricks"
border="0" style="position: fixed; bottom: 10%; right: 0%; top: 0px;"
/></a><a href="http://24work.blogspot.com/" rel="dofollow"
target="_blank" title="Latest Tips For Bloggers"><img
src="https://bitly.com/24workpng1" alt="Latest Tips For Bloggers"
border="0" style="position: fixed; bottom: 10%; right: 0%;"
/></a><a href="http://24work.blogspot.com/" rel="dofollow"
target="_blank" title="Blogger Tricks"><img
src="https://bitly.com/24workpng1" alt="Blogger Tricks" border="0"
style="position: fixed; bottom: 10%; left: 0%;" /></a>
<style type="text/css">
#myslides{
background:#2c3133;
}
.stepcarousel{
position: relative; /*leave this value alone*/
overflow: scroll; /*leave this value alone*/
width: 95%; /*Width of Carousel Viewer itself*/
height: 165px; /*Height should enough to fit largest content's height*/
margin: 0px 14px 5px 14px;
background:#2c3133;
}
.stepcarousel .belt{
position: absolute; /*leave this value alone*/
left: 0;
top: 0;
}
.stepcarousel .panel{
float: left; /*leave this value alone*/
overflow: hidden; /*clip content that go outside dimensions of holding panel DIV*/
margin: 10px 17px ; /*margin around each panel*/
width:220px; /*Width of each panel holding each content. If removed,
widths should be individually defined on each content DIV then. */
background:#202325;
height:140px;
border:1px solid #393f42;
}
.stepcarousel .panel p{
text-align: left; /*leave this value alone*/
overflow: hidden; /*clip content that go outside dimensions of holding panel DIV*/
margin: 5px 5px ; /*margin around each panel*/
}
.stepcarousel .panel h2{
text-align: left; /*leave this value alone*/
height:20px;
overflow: hidden; /*clip content that go outside dimensions of holding panel DIV*/
margin: 2px 5px ; /*margin around each panel*/
font-size:16px;
font-weight:bold;
text-align:center;
font-family:Georgia,century gothic,Arial,verdana, sans-serif;
}
.stepcarousel .panel img{
float: left; /*leave this value alone*/
background:#040404; /*clip content that go outside dimensions of holding panel DIV*/
margin: 10px 10px 10px 10px; /*margin around each panel*/
padding:0px 0px;
}
</style>
<div id="myslides">
<script type="text/javascript">
stepcarousel.setup({
galleryid: 'mygallery', //id of carousel DIV
beltclass: 'belt', //class of inner "belt" DIV containing all the panel DIVs
panelclass: 'panel', //class of panel DIVs each holding content
panelbehavior: {speed:500, wraparound:true, persist:true},
defaultbuttons: {enable: true, moveby: 2, leftnav:
['https://blogger.googleusercontent.com/img/b/R29vZ2xl/AVvXsEjQwYgYOTSdt-TcYl3PvrLw7LQsbFYH5UDSDmZON0uRS-Z5A8MyDibUFZ-yLcurn48M78bod-8j8cRUjeyWij3gmweKzIWPgTsY_Qtxx_ojIuedyVSPQi4eYy5hgfPODVCNJiW15EzJU2Eh/',
-14, 60], rightnav:
['https://blogger.googleusercontent.com/img/b/R29vZ2xl/AVvXsEiGXF3kY5forOwGoUgvakKWZYqZRLIbB8tJB7iBQkl53GToPb_yKFxNGQnBJ_T5mElkDe1yn87VZnAavRMpBuOhX3bJvIHOV73TRzDUsa-0Vy5DnXe-588OAWSYcFNoenOibqzmktD_WZTb/',
0, 60]},
statusvars: ['statusA', 'statusB', 'statusC'], //register 3 variables
that contain current panel (start), current panel (last), and total
panels
contenttype: ['external'] //content setting ['inline'] or ['external', 'path_to_external_file']
})
</script>
<div id="mygallery" class="stepcarousel">
<div class="belt">
<div class="panel">
<a href="မိမိပို႕စ္လင့္ထည့္ပါ" target="_blank" title="This is featured post 1 title">
<img alt=" " width="200"
src="ပုံလင့္ထည့္ရန္"
height="120"/>
</a>
</div>
<div class="panel">
<a href="မိမိပို႕စ္လင့္ထည့္ပါ" target="_blank" title="This is featured post 2 title">
<img alt="" width="200"
src="ပုံလင့္ထည့္ရန္"
height="120"/>
</a>
</div>
<div class="panel">
<a href="မိမိပို႕စ္လင့္ထည့္ပါ" target="_blank" title="This is featured post 3 title">
<img alt="" width="200"
src="ပုံလင့္ထည့္ရန္"
height="120"/>
</a>
</div>
<div class="panel">
<a href="မိမိပို႕စ္လင့္ထည့္ပါ" target="_blank" title="This is featured post 4 title">
<img alt="" width="200"
src="ပုံလင့္ထည့္ရန္"
height="120"/>
</a>
</div>
<div class="panel">
<a href="မိမိပို႕စ္လင့္ထည့္ပါ" title="This is featured post 5 title">
<img alt="" width="200"
src="ပုံလင့္ထည့္ရန္"
height="120"/>
</a>
</div>
</div>
</div>
</div>
<div class="clear"></div>

မွတ္ခ်က္ ။ ။ မိမိတို႕ ကုဒ္ေတြ ေကာ္ပီယူ ထည့္တာနဲ႕ ျပဳျပင္စရာေတြ ရွိလာမွာပါေနာ္
(၁) "
ပုံလင့္ထည့္ရန္" ဆိုတဲ့ေနရာမွာ မိမိတို႕ ျပလိုတဲ့ပုံရဲ႕ လင့္ကိုပါ။
(၂) "
မိမိပို႕စ္လင့္ထည့္ပါ" ဆိုတဲ့ေနရာမွာ ညႊန္ျပတဲ့ ေနရာရဲ႕ လင့္ကို ထည့္ေပးပါ။
(၃)
This is featured post 5 title ဆိုတာကေတာ့ ညႊန္ျပတဲံ ပို႕စ္ရဲ႕ ေခါင္းစဥ္အမည္ေပါ့ေနာ္ ။
ဒါဆိုရင္ ျပည့္စုံပါျပီ မိမိတို႕ဘေလာ့ေပၚမွာ ေအာ္တို သြားေနတဲ့ စလိုက္ေလးကိုပိုင္ဆိုင္ပါျပီ သူကေတာ့
၅ ခုတိတိပါ၀င္တာျဖစ္ပါတယ္.. မိမိလမ္းညႊန္လိုေသာ ေနရာ ၅ ခုကိုထည့္လုိက္ပါေနာ္...


.jpg)